Preparing shapefile
Using ESRI ArcMap software create or select candidate polygons for spatial overlay ensuring they have the fields that
correspond with your overlay type.
The shapefile should follow these data standards:
1. Projection
Ensure the projection is set to Albers NAD 83 when creating a shapefile for use with the applicatoin. If not in Albers NAD 83 use
ESRI software to reproject the shapefile.
The Shape file should be a simple polygon and not contain Z and M attributes
(if your file has Z and M attributes use Feature class to feature class tool and disable Z and M in the environment settings)
2. Adding Fields
Add fields with correct type and size
Add the following fields to your shapefile. The application will not accept the uploaded shapefile unless these fields exist with proper field types listed below.
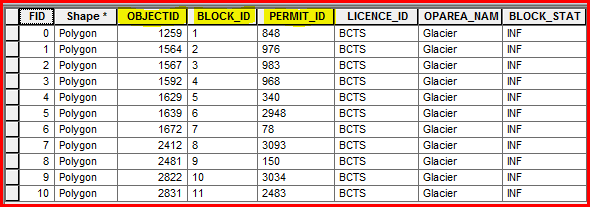
a. Cutblock
BLOCK_ID - text 20 – numbers only - unique - this is a unique ID that will appear on the report, it does not necessarily have to correspond with the 'true' block ID
PERMIT_ID – text 15 – alpha numeric
LICENCE_ID – text 15 – alpha numeric
Example of what the Cutblocks table could look like after adding the proper fields:
b. OGMA
OGMA_ID – text 20 – numbers only
Example of what the OGMA's table could look like after adding the proper fields:

3. Add data
"Donut holes" in cutblocks (WTP/NP) should not have any data showing in them.
4. Compress to Zip file
Windows default compression (right-click --> 'Send to'), winzip or other programs that produce a compressed zip file will compress shapefiles. Ensure
all shapefile pieces are selected and compressed (.shp, .dbf, .shx, etc).
Created with the Personal Edition of HelpNDoc: Easily create iPhone documentation